[原創] 使用SDCC開發新唐N76E003 1T 8051
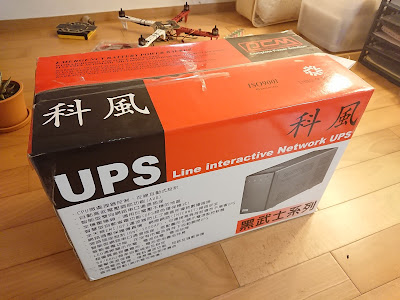
新唐科技2017年推出了一顆新的1T 8051 MCU,在一個TSSOP-20的封裝裡提供高達18PIN的I/O接腳,並且與STM8S003 pin to pin相容。內建1T 8051核心,具18KB Flash程式記憶體、1KB SRAM(256Byte + 768Byte XRAM),周邊包含6通道16-bit PWM、8通道12-bit ADC、SPI介面、I2C介面及兩組UART,小小一顆功能卻非常強大,可說是麻雀雖小,五臟俱全。
N76E003開發板 : http://goods.ruten.com.tw/item/show?21819007454427
另外傳統的8051指令週期為12T,也就是一條指令至少要12個時脈來完成。大部分的指令都可以在1到2個指令週期完成,而除法這種較複雜的指令則要4個指令週期來完成。所以傳統的8051每條指令所需的時脈會是12的倍數。
然後新唐的1T 8051意思就是指令週期為1T,一條指令至少要1個時脈來完成,而每個指令所需的時脈都會是1的倍數,好處是程式的執行速度可能比較快,缺點是如果在優化timming較不容易計算每條指令所花費的時間。
http://www.keil.com/dd/docs/datashts/intel/ism51.pdf
不過一點較可惜的部分新唐官方提供的BSP僅支援keil c51和IAR,以大家拿手的keil來說免費評估版本code size具2KB限制,除非花錢去買正版軟體不然18KB的flash也只能看著流口水,且礙於code size限制這麼多功能可能也發揮不起來,於是著手研究看看如何使用sdcc進行開發。
一、SDCC
SDCC: Small Device C Compiler,一套開源的微控制器C語言編譯器,起初僅針對MCS-51系列的微控制器所開發,現在除了MCS-51以外已經支援Z80、STM8、PIC14、PIC16等常見的微控制器。
我們可以從官網下載並安裝最新版本的SDCC: http://sdcc.sourceforge.net/snap.php#Windows
安裝結束後可以勾選add to system path以便我們能夠直接在cmd或ps中直接使用sdcc。完畢後要重新開機才會套用環境變數。
二、使用SDCC別於Keil C51的部分
基本上會有三個地方需要注意,第一點就是暫存器記憶體位址的定義方式
由官網下載的N76E003_BSP_Keil_C51_V1.0.5可以發現,N76E003.h中是以這樣定義暫存器的
http://www.nuvoton.com/hq/products/microcontrollers/8bit-8051-mcus/low-pin-count-8051-series/n76e003/?__locale=zh_TW
然而從SDCC的使用者手冊中第3.5.1.7章節可以發現SDCC認定的定義方式為,且special bit不能像keil透過P0^0表示P0的第0個bit,必須為確切的位址。
http://sdcc.sourceforge.net/doc/sdccman.pdf
Please note, if you use a header file which was written for another compiler then the __sfr / __sfr16 / __sfr32 / __sbit intrinsic named address spaces will most likely be not compatible. Specifically the syntax sfr P0 = 0x80; is compiled without warning by SDCC to an assignment of 0x80 to a variable called P0.
再來就是中斷服務程式的寫法不一樣
在Keil裡面像是這樣
另外中斷向量的編號可以參考N76E003 datasheet中的20. Interrupt system
由於MCS-51均提供8個byte的空間給各個中斷服務程式使用,所以即便是像N76E003這種增強型的51,Compiler也能夠自動根據中斷向量編號來判斷中斷向量位址。
最後,一些型態的名稱如bit,在keil裡面叫bit,在sdcc叫__bit,這部分可以參考使用者手冊3.5.1.6章節!
三、修改N76E003.h
如先前提到的,由於SDCC定義暫存器的方式與Keil不同,我們得將N76E003.h修改成對應的格式
這部分大概是最考驗意志力的地方,由於格式難以用取代或excel等方式直接修改,個人是用笨方法一行行改 ... 不過各位不用擔心,會幫各位整理好懶人包:
N76E003_BSP_SDCC_MCS51
四、將common.h及delay.c中的型態bit修改為__bit
五、將Function_define.h中的<intrins.h>刪除
由於sdcc內建的header file並未包含intrins.h,我們要將Function_define.h中#include <intrins.h>刪除,並將#define nop _nop_();改為#define nop __asm__ ("NOP");
五、建立專案
1. 首先我們先在PC的磁碟機上建立一個資料夾存放程式碼
2. 將N76E003.h、Common.c、Common.h、Delay.c、Delay.h、SFR_Macro.h、Function_define.h複製到這個資料夾
3. 點選右鍵新增文字文件,並命名為main.c

4. 以編輯器(記事本、Notepad++、VS Code)開啟main.c並敲入程式碼
1. 先在該資料夾中按著Shift鍵點滑鼠右鍵,點選"在這裡開啟PowerShell視窗"

sdcc -c delay.c -D FOSC_160000
透過ls可以觀察編譯前後檔案的變化,編譯後會產生.asm及.rel的object file

sdcc會自動編譯main.c將library連結在一起並產生main.inx的燒錄檔


N76E003開發板 : http://goods.ruten.com.tw/item/show?21819007454427
另外傳統的8051指令週期為12T,也就是一條指令至少要12個時脈來完成。大部分的指令都可以在1到2個指令週期完成,而除法這種較複雜的指令則要4個指令週期來完成。所以傳統的8051每條指令所需的時脈會是12的倍數。
然後新唐的1T 8051意思就是指令週期為1T,一條指令至少要1個時脈來完成,而每個指令所需的時脈都會是1的倍數,好處是程式的執行速度可能比較快,缺點是如果在優化timming較不容易計算每條指令所花費的時間。
http://www.keil.com/dd/docs/datashts/intel/ism51.pdf
不過一點較可惜的部分新唐官方提供的BSP僅支援keil c51和IAR,以大家拿手的keil來說免費評估版本code size具2KB限制,除非花錢去買正版軟體不然18KB的flash也只能看著流口水,且礙於code size限制這麼多功能可能也發揮不起來,於是著手研究看看如何使用sdcc進行開發。
一、SDCC
SDCC: Small Device C Compiler,一套開源的微控制器C語言編譯器,起初僅針對MCS-51系列的微控制器所開發,現在除了MCS-51以外已經支援Z80、STM8、PIC14、PIC16等常見的微控制器。
安裝結束後可以勾選add to system path以便我們能夠直接在cmd或ps中直接使用sdcc。完畢後要重新開機才會套用環境變數。
二、使用SDCC別於Keil C51的部分
基本上會有三個地方需要注意,第一點就是暫存器記憶體位址的定義方式
由官網下載的N76E003_BSP_Keil_C51_V1.0.5可以發現,N76E003.h中是以這樣定義暫存器的
http://www.nuvoton.com/hq/products/microcontrollers/8bit-8051-mcus/low-pin-count-8051-series/n76e003/?__locale=zh_TW
sfr P0                  = 0x80;
sbit P00                = P0^0;
然而從SDCC的使用者手冊中第3.5.1.7章節可以發現SDCC認定的定義方式為,且special bit不能像keil透過P0^0表示P0的第0個bit,必須為確切的位址。
http://sdcc.sourceforge.net/doc/sdccman.pdf
__sfr __at (0x80) P0;
__sbit __at (0x80) P00;
Please note, if you use a header file which was written for another compiler then the __sfr / __sfr16 / __sfr32 / __sbit intrinsic named address spaces will most likely be not compatible. Specifically the syntax sfr P0 = 0x80; is compiled without warning by SDCC to an assignment of 0x80 to a variable called P0.
再來就是中斷服務程式的寫法不一樣
在Keil裡面像是這樣
void PWM_ISR (void) interrupt 13
{
    clr_PWMF; // clear PWM interrupt flag
    P12 = ~P12;             // GPIO1 show PWM INT
}
而在SDCC裡面則要這樣,可參考手冊3.8章節void timer_isr (void) __interrupt (1) __using (1)
{
...
}
The optional number following the __interrupt keyword is the interrupt number this routine will service. When present, the compiler will insert a call to this routine in the interrupt vector table for the interrupt number specified. If you have multiple source files in your project, interrupt service routines can be present in any of them, but a prototype of the isr MUST be present or included in the file that contains the function main. The optional (8051 specific) keyword __using can be used to tell the compiler to use the specified register bank when generating code for this function. Interrupt service routines open the door for some very interesting bugs另外中斷向量的編號可以參考N76E003 datasheet中的20. Interrupt system
由於MCS-51均提供8個byte的空間給各個中斷服務程式使用,所以即便是像N76E003這種增強型的51,Compiler也能夠自動根據中斷向量編號來判斷中斷向量位址。
最後,一些型態的名稱如bit,在keil裡面叫bit,在sdcc叫__bit,這部分可以參考使用者手冊3.5.1.6章節!
三、修改N76E003.h
如先前提到的,由於SDCC定義暫存器的方式與Keil不同,我們得將N76E003.h修改成對應的格式
這部分大概是最考驗意志力的地方,由於格式難以用取代或excel等方式直接修改,個人是用笨方法一行行改 ... 不過各位不用擔心,會幫各位整理好懶人包:
N76E003_BSP_SDCC_MCS51
四、將common.h及delay.c中的型態bit修改為__bit
五、將Function_define.h中的<intrins.h>刪除
由於sdcc內建的header file並未包含intrins.h,我們要將Function_define.h中#include <intrins.h>刪除,並將#define nop _nop_();改為#define nop __asm__ ("NOP");
/*-------------------------------------------------------------------------- N76E003 Function_define.h V1.02 All function define inital setting file for Nuvoton N76E003 --------------------------------------------------------------------------*/ #include <intrins.h> #include <stdio.h>改為#define nop _nop_();
/*-------------------------------------------------------------------------- N76E003 Function_define.h V1.02 All function define inital setting file for Nuvoton N76E003 --------------------------------------------------------------------------*/ #include <stdio.h>#define nop __asm__ ("NOP");
五、建立專案
1. 首先我們先在PC的磁碟機上建立一個資料夾存放程式碼
2. 將N76E003.h、Common.c、Common.h、Delay.c、Delay.h、SFR_Macro.h、Function_define.h複製到這個資料夾
3. 點選右鍵新增文字文件,並命名為main.c

4. 以編輯器(記事本、Notepad++、VS Code)開啟main.c並敲入程式碼
#include "N76E003.h"
#include "Common.h"
#include "Delay.h"
#include "SFR_Macro.h"
#include "Function_define.h"

void main(void)
{
 Set_All_GPIO_Quasi_Mode;
 while(1)
 {
  P12 = !P12;
  Timer1_Delay10ms(5);
 }
}
六、使用SDCC1. 先在該資料夾中按著Shift鍵點滑鼠右鍵,點選"在這裡開啟PowerShell視窗"

2. 一個專案中除了主程式以外若還有其他.c檔案作為library,我們會稱之為"multiple source file project"。根據SDCC User manual 3.2.3 Projects with Multiple Source Files,我們要先把library編譯成object file備用,最後再透過linker將其與主程式link在一起
所以我們先在powershell輸入這兩行
sdcc -c common.c -D FOSC_160000sdcc -c delay.c -D FOSC_160000
透過ls可以觀察編譯前後檔案的變化,編譯後會產生.asm及.rel的object file

3. 編譯及連結主程式,如上述我們會先將library編譯成object file備用再透過linker將其與主程式link在一起,不過在這邊我們只需要簡短地輸入
sdcc main.c common.rel delay.rel

七、燒錄
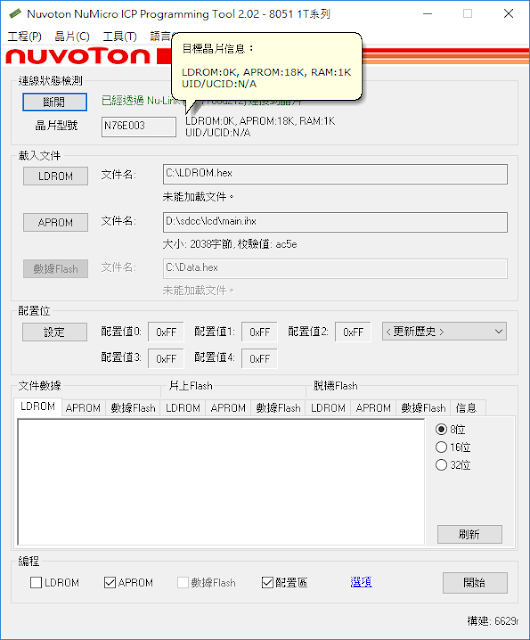
1. 開啟NuMicro ICP Programming Tool,目標晶片要選擇成8051 1T晶片,然後按下繼續

2. 接著按下左上角的連接,即可與目標板連接。連接後會顯示晶片型號及資訊。


3. 點選APROM,將檔案格式設為所有格式,並選擇剛才輸出的main.inx

4. 最後按下開始等待燒錄完畢就可以看到開發板上的LED一閃一閃囉


測試發現, 有個 register 寫錯了, 正確如下(N76E003.h)
回覆刪除__sbit __at (0xCA) TR2 ; // T2CON^2;
OK,感謝指正,已更新上傳,謝謝您
刪除Pay atention on TA protected instructions, SDCC (v. 3.8) transforms "Memory|=Constant" in "mov %6, #data/ mov%7, #0x00/orl adress, %6", TA window protection works only for 4 cycles, so the way in hidder change "Memory|=Constant" at __asm__("orl Adress, #data"). Thanks for article, helped alot to start with N76E003 in SDCC.
回覆刪除厲害了
回覆刪除謝謝分享, 請受我一拜
回覆刪除